I started where I always do...the TES. I found on here a great lesson idea and set of resources by 'Webster75'. The resources involve looking at airport runways, the numbers on each of end of the runways and then creating your own airport with the correct numbers on the ends of the runways based on their bearings.
A link to the resource: http://www.tes.co.uk/teaching-resource/Runways-GCSE-Bearings-Lesson-6079340/
There is an in depth lesson plan as part of the resource that has a whole host of ideas to use. Some of these I did, others I chose not to based on my class' needs. However, I do like the idea of taking a class outside and doing the 1st activity using compasses.
I decided to use the powerpoint resources in the resource to introduce bearings to the class and how they relate to the numbers on the ends of the runways. Then, as suggested in the lesson plan, I decided to give my students a laptop 1 between 2 to use Google Earth to investigate the link between the numbers on the runways.
I was concerned as to whether Google Earth would work fast enough and well enough in class but these concerns soon disappeared when the students started to use the program. I asked them to look at Gatwick, Heathrow and then any other airport of their choice to start with. This led to a few conversations of places my students had been to or where their relatives where from (a great way to get to know your students a bit better).
I then got them to write down the numbers on each end of the runway, the actual bearing at either end and then once they had a few of these to try and find a link between them; I used the 'key questions' part of the lesson plan here.
I then drew out a similar diagram to one of the ones shown in the powerpoints to draw some of the bearings on. This helped to visualise the concept a bit clearer and some were able to see that the 'north' lines were parallel. This then led to me asking about what they knew about angles and parallel lines. Some students were able to point at those that were equal on my diagram, others were able to say which two angles added to 180 degrees. We soon drew out the link from these conversations and the students then used Google Earth to find another airport to check if their new 'rule' applied here too.
Some of the airport images...
If you don't have access to Google Earth you can get these images off of Google Maps, print them out and give them to students in pairs/groups and ask them to do the same as if they had the program to work with.
 Gatwick Airport:
At the end of this runway you see the numbers 06, this means a bearing of 060 degrees
 At the opposite end of the runway you see the numbers 26, meaning a bearing of 260 degrees.
Some students noticed a difference of 180 degrees between the bearings. When drawing the runway with the north lines and bearings at each end you are able to see the co-interior angles summing to 180 degrees.
Dubai:
 12; bearing of 120 degrees. It's co-interior angle would then be 60 degrees (or a bearing of 060 in the case of the runway) so a bearing of 300 degrees would be at the other end of the runway, noted by the digits 30.
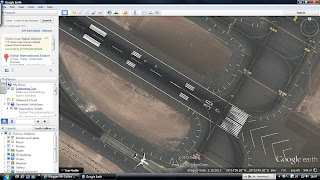
Be warned...after the kids have looked up what you ask them the first thing they'll do is search for their house, their friends house their uncle's house etc. Or...they'll try and get the flight simulator to work, or visit the moon, mars and space!
I recommend this resource to other mathematics teachers looking to teach Bearings at some point in the future. Be sure to take a look through the lesson plan as there are lots of ideas for tasks/activities you can do in and around using Google Earth as I did above.
Tidak ada komentar:
Posting Komentar