Finished and approved the plan for MST209 today. Status: in-progress.
I have been revising some physics: classical ( Newtonian ) mechanics. Amazing what we can do with three simple laws and a few calculus tools: the foundation of modern technology.
Selasa, 30 November 2010
(How to) Get a Job
 Dr. Thomas Reeder, Associate Superintendent of Wyoming Public Schools, was kind enough to come talk to our secondary mathematics student teachers about life after student-hood. He has had an amazing career already, starting as a K-12 certified teacher and becoming a literally award-winning administrator. He gave me permission to take notes to share.
You might here someone say, "The best thing about teaching is June, July and August", but that is nowhere near true. The best thing is the students. Decent pay and benefits, but it's the students that are why you teach.
This is a good time to be a math teacher because of retiring teachers (state buyouts) and Michigan's new 4 year math requirement. There are some jobs. Science minors are excellent, too. As you're getting ready to apply, you want to think about what sets you apart.
There are different certifications: state certification and highly qualified. Major or minor, plus certification test equals highly qualified. Sciences and social sciences are content specific. In your materials, be clear about what you are qualified to teach. Once you're hired, the district will put you where you are needed. Know the Michigan Merit Curriculum, which has changed even since you were in high school. Four years of math, English and science, a world language, health, etc.
Figure out which students you want to teach. Figure out where you want to teach. The state, the type of area, urban or near-urban... but evaluate where you want to be. Rural teachers whose schools have not been able to hire new teachers for consecutive years.
Michigan teachers are paid well (top 3) with much lower cost of living than other high-paying states. You will never be affluent, except for what you get from your students.
Resume
 |
| L Hollis @ Flickr |
What to do to get ready: be involved in educationally relevant experiences. What do you do outside of your teaching? Conferences, tutoring, coaching, special events like a math night or tutoring night, etc. The more you have those experiences the better. I'm looking at between 100 and 1000 resumes. If you're a rookie, what else have you done that makes you not a rookie.
The two crucial areas of relationships are with parents of students, and with your peers. 100% of parents believe that there kids are 100% innocent... what will you do? Get experiences with conferences. We have a principal who can remain calm in the face of full out screaming and cursing. You don't need to take it: "I'm not going to talk with you now if you can't speak civilly..." give a warning. But then you can hang up.
Other work experiences can be valuable if they build up the image of who you are. Never lie on your resume. Never - that's a firing offense. If you were fired from a job, you can still put it on. When you're asked for employment history, you need to be complete.
I've only put my educationally relevant jobs - should I put the other ones? Sure. Maybe going back to senior year of high school. Does your experience show the ability to balance? Loyalty?
Should I list volunteering in high school, or is that too far back? I would put it in.
Should I list a full education history? Yes. High school plus all your colleges.
You can list or not list you GPA on your resume, but I always look at transcripts. I don't want all A's, but I want to know about retakes, how long, what kind of student you were. Some of the teachers who have struggled for us, also struggled in college.
Personalities are more important now than before; maybe you've heard about speed interviews - we might use those as kind of a screener before more in depth interviews. Now while you're a student, belong to the professional organizations. It's dirt cheap and they are valuable. Then make sure they're listed on the resume.
Get your resume down to two pages. Include relevant personal interests. One person got a job because they listed skiing and they needed someone for ski club. Schools will want you to have multiple roles, coaching, clubs, drama, etc. Plus, as a teacher, it is going to help you see your students in a different way. And help them see you in a different way.
The number of mistakes on resumes is unbelievable. You need to proof them and clean them up totally. If you're not good at it, get help. Even a professional. The resume isn't tailored to a specific job... that's the...
Cover Letter
With internet applications we went from dozens to hundreds of applications. The cover letter is how you tailor your application. Be specific to the school or district. Don't be generic. Share what you know about the school and district. A question we ask is: tell us about yourself, (2) tell us what you know about Wyoming Park. Personalize your cover letter. If you were dating someone, you would write a personal letter. Will that mean you write a lot of letters? Yes. Go there or at least do your homework. You need to know if you want to be there anyway. What will set you apart?
Three paragraph essay: a little about yourself, what you know about the district and your fit; an overview of yourself and what qualifies you; a wrap-up.
Is the cover letter and resume it? Each district have specific information they request. Follow their instructions exactly. The old adage was go in person. Don't do that anymore. It's annoying and might even count against you. In our district, resumes go to our HR person. They put the piles together and vet the resumes. Then they go to the principals. The only thing to check with the central office is to make sure they received all your materials.
How many references? Sometimes it's specific, some will be general. If they don't specify, 3 or 4 is appropriate. Make sure your references know what you're doing.
Start putting your materials together now. You can still tweak. Two periods for hiring are a little bit in January, and then June-August or even Septemeber. We hired 6 people at the start of school.
Preparation
Use those weeks after you graduate to sub. Get your name out there. Subbing is the best and worst job. Maybe 80% of our hires come out of our sub pool. Why? There's safety in hiring people that you've tested out in some way. Maybe you have another job, but is that going to lead to the teaching job you want. You don't have to sub every day. It will give you experiences to help you decide what you want and don't want.
What are red flags? It's not supposed to be about your personal characteristics. No picture, for example. No gimmick. Got one with a plate of chocolate chip cookies. Some might like it, I don't. I don't want any preconceived ideas about you as a candidate.
Some teachers don't want to teach the high level classes. I got my first job because none of the current teachers wanted to teach AP calc. I was an A student, but that calc class was a shock. The kids caught on quickly, and then after a year it finally, totally clicked. "I thought this was hard, but it is so easy."
If you want to go out of state: check out the particular standards. Michigan standards are pretty high, so shouldn't be too much of an issue. Be careful about pay and benefits. If you're young, go anywhere you want, but look into it. There are good websites for out of state jobs. MASB is a good source for Michigan jobs.
Resume, cover letter, portfolio (paper or DVD), put a lesson together that you could use. You might hear on a short timeline, so you want to have things done ahead of time.

If you get called, be very courteous. They may give you some options as to time. What you want to do is change anything you have to do to get to that interview. If there is a reason, work around it, share the reason and make sure it's important. I had a conflict with a game I was coaching and they were willing to interview me on Saturday.
Bring whatever they ask. It is okay to ask a question, "do you want me to bring..." Don't ask anything else. You need to show initiative to get the information you need. Now it's time to do your homework. You have got through the biggest hoop, you have your foot in the door. Find out anything you can. School Improvement Plan, classroom management system, special district programs, anything they put online. Go visit the town and the school. My first job I went to the town for two days, talked to people in the coffee shop, found out a ton. Plus I found out that it was a job I wanted. But it would have been just as good to find out if I didn't want it.
When they ask you if you have questions, have some. Be specific with what you've found out about the school. What about your poor grades in math, your SIP, your ...
Don't ask about salary and benefits. With the one exception that if you're choosing between offers and need to know that information.
Dress appropriately. Comfortable. Suit okay? Yes. But dress up at least equivalently of a dressed up teacher.
I will never tell you not to be yourself, but nose rings, tattoos, piercings ... be aware of the effect. There are places where a man with an earring can not get hired. Impressions are natural and always happening. The interviewers will be forming impressions immediately.
Should I introduce myself to each person, shaking hands? Absolutely. Plus it will help you relax. Good firm, practiced handshake. I've interviewed people so nervous they broke out in hives. Know yourself. If you speak quickly when nervous, pay attention and slow down. Don't be afraid to do what you need. If you need to doodle, take notes, then bring a pad of paper.
Sometimes we'll ask a three part question to see if the candidate can track all three parts. Good time to have paper. If you bring in something extra, don't be afraid to leave it anyway. (If it's something to be left.) Or ask if they want to look at it before you go.
Every district interviews differently. Short, long, test class to adults or a summer program. The hard part of the interview is that you're looking for the best candidate, but it's insufficient to really know what kind of teacher you're going to be.
Typically, there are a dozen questions.
- Starting with tell us about yourself. Don't stick to the resume, complete it. Extra training, share your personality.
- Tell us about the district.
- Scenario questions: how would you handle...
- Philosophy: what do you believe about...
- Management: what do you do to make a learning environment? Not about having your thumb on the students.
- Past experiences
- Expertise areas
- Maybe: content questions.
- Try googling teacher interview questions.
Mistakes:
- be succinct in your answers but completely answer the question. Okay to pause and think. If you're going on and on, catch yourself. Not so short that you leave blanks.
- Be punctual. (If something happens, call on the cell and inform.) Be in the area early. Don't have to go in the building, but be close.
- Don't be so nervous that you can't communicate who you are.
- Be aware of yourself. Are you a loud talker? Too quiet? People have probably told you already things you can work on.
- Writing samples might happen on 2nd round. Sometimes tech skills, although that's not an issue for novice teachers. I had an interview where they left me with 2 questions and 2 sheets of paper and an hour to answer them.
- Pay attention to their time if they've given you their limits. Too fast, too slow - monitor. Be done with questions a few minutes early to leave room for dialogue.
The most impressive things are: being confident and comfortable. (Not too confident. Eg the interviewee who asked when they would be signing the offer since they were sure to get it.) Lean in towards the interviewers, make eye contact, look at everyone. At the end, ask a good solid question. OK to have written it ahead of time. (Maybe have 2 in case they ask you one.) Ask about resources that are available, ask about tech. This would impress me: " I notice you use Prentice Hall. Do you use..." "I know you are on trimesters..." "For your after-school tutoring, do teachers..."
You have worked hard to get here - don't skimp on the work for this last thing to get the job you want.
 |
| shareski @ Flickr |
Profession
Can I take chances the first year? Not sure what you mean. But there are two grounds for immediate dismissal: (1) don't touch a kid (2) you're young; know about what is appropriate and inappropriate with a student. I was 21 at my first job, with students who were 18 and 19. Now we have parents that have hit on our teachers. The third thing would be finances; be careful if you're responsible for any school funds.
Michigan has curricula for academic content. But some schools have policies like abstinence-only education or creationism... you should know that. If you don't know, check with someone else. You can always tell a student, "I will check."
You will make mistakes, how are you going to grow from them. You might be miffed at how you see colleagues teaching or treating kids. Classroom management is hard to develop as a student teacher. When you start from the beginning, you'll need a way to have control.
The four years towards tenure are for the school to evaluate your performance and your growth. By law, every teacher needs to be evaluated every year. You want feedback, though. I'd rather know my struggles in November than in June. Have people come in and watch you teach. We have a lot of team teaching now with ELL and special education students. You want to be the best you can be.
Looking back at my career, I would have gotten a Spanish degree in addition. When I started, there was small need, but now, working in an urban district, it's a great need. If you're interested in administration ever, you have to be involved in all areas of the school. Get on a School Improvement Team (now required in each school by state law), be active in all areas of school life. Teacher, union, coaching... when I went into administration there were 10 positions they had to fill! I took that as a good sign that I was involved.
Minggu, 28 November 2010
Math and Multimedia 5


This blog carnival seeks to promote seven principles:

Sol Lederman at Wild About Math shares a video of an Incredible Magic Square.
Antonio Gutierrez at Go Geometry has a fascinating golden rectangle puzzle that connects with the Droste effect.
 2. Connections between math and real life; use of real-life contexts to explain mathematical concepts
 John D Cook at the Endeavor shares that there isn't a googol of anything.
Grrrl Scientist suggested this article from her guardian.co.uk blog about "How the leopard got its spots" that has some literally beautiful mathematics.
Consider this beautiful film by Cristóbal Vila - Nature by Numbers. Or this collection of Hands On Math Movies.
David Cox has just been sharing a ridiculous amount of great stuff lately. For example, projectile motion.
It's been widely shared, but you have to check out Kate Nowak's money take on special right triangles at f(t).
 3. Clear and intuitive explanation of topics not discussed in textbooks, hard to understand, or difficult to teach
 James Tanton has two videos explaining the principles for math genius thinking. Hat tip: Denise at Let's Play Math. You might also like Sue Van Hattum's interview of Dr. Tanton for the Math 2.0 interest group.
 For that matter, Sue's post at Math Mama Writes about E is for Eigenvectors and Eigenvalues belongs in this category. Has the great first sentence: "This post is about fear."
I spent some time recently looking at trigonometric function visualizations and making a couple Geogebra sketches for them and their inverses. Seems silly to link, since it's right down there.
4. Proofs of mathematical theorems in which the difficulty of the explanation is accessible to high school students

No one nominated entries in this category, but it makes me think of work like James Tanton's explanation of Euler's proof that every even perfect number is triangular, or Alexander Bogomolny's proofs at Cut-the-Knot of the addition and subtraction formulas for sine and cosine. (Both of these sites I've had occasion to look up recently!)
 5. Intuitive explanation of higher math topics, in which the difficulty is accessible to high school students
 Derek Bruff has put together a fascinating interactive Cryptography Timeline. I'd love to see some of these for some important math concepts.
 6. Software introduction, review or tutorials
 Guillermo Bautista, the founder of this here carnival, at the Math and Multimedia blog, has a roundup of essential tools for every math blogger. Also be sure to check out his terrific Geogebra tutorials while at his site.
 Maria Anderson has video of her presentation from MAA-Michigan up, Math Technology to Engage, Delight and Excite. Also watch as her new blog, Edge of Learning, gets up and running.
Chris Betcher has some terrific Scratch (the programming language) resources and videos.
You might try one of these 15 mind-mapping tools. (Many are free.)
 7. Integration of technology (Web 2.0, Teaching 2.0, Classroom 2.0), in teaching mathematics
 David Wees has an interesting meditation on the importance of interactivity in math teaching.
Cybraryman has a long list of math/tech integration resources and lessons.


If you're looking for Five tunes, Take 5, or try Gimme 5 from Sesame Street, High Five from They Might Be Giants, Dino 5 (who also have a great counting rap called What About 10)?, or maybe the best (in terms of math) ...
 If you have ever posted a blog carnival, you know that you receive a lot of obvious spam. But some can seem relevant, so I like to have a Best of the Spam category. For example, the Top 40 sources for open courseware video.
 And if you are mistakenly put here, or your post did not appear, please let me know and I will correct it posthaste.
Images were obtained from Creative Commons search. Attributions are in the picture title - click on the image and you will see the source from Flickr.
 If you enjoyed the carnival, please consider nominating a blogpost, your own or someone else's, for the sixth edition, to be held at Great Maths Teaching Ideas by William Emery. It's a very active blog with many K-12 activities, so don't wait a month to check it out!
Congratulations if you recognized the five connection for each of the images above. I tried to slip in some tricky ones.
If the carnival is done, must be time to head over to the Five Bells. Cheers!
പത്താം ക്ലാസ് ചോദ്യപേപ്പര് മൂന്നാം ഭാഗം

പത്താംക്ലാസുകാര്ക്കു വേണ്ടിയുള്ള റിവിഷന് പേപ്പറിന്റെ മൂന്നാംഭാഗം ഇന്നു പ്രസിദ്ധീകരിക്കുകയാണ്. താഴെയുള്ള ലിങ്കില് നിന്നും ചോദ്യങ്ങള് ഡൗണ്ലോഡ് ചെയ്ത് കുട്ടികള്ക്ക് നല്കാം. അതിനോടൊപ്പം അനുബന്ധമായി ഒരു പസിലായാലോ. അതെ, ത്രികോണങ്ങളുടെ സാദൃശ്യവുമായി നേര്ബന്ധമുള്ള പുതിയൊരു പസിലിലേയ്ക്ക് സ്വാഗതം. ഇതൊരു പഠനപ്രവര്ത്തനം കൂടിയാണ്. ഒന്പതാംക്ലാസിലെ കുട്ടികള്ക്ക് നല്കാവുന്ന ഒരു തുടര്പ്രവര്ത്തനം. പസില് സോള്വ് ചെയ്യാമോ?
താഴെ കൊടുത്തിരിക്കുന്ന ചിത്രം കാണുക.രണ്ട് മട്ടത്രികോണങ്ങളുണ്ട് .ത്രികോണം ABC യും ത്രികോണം ACDയും . അവ ചേര്ത്തുവെച്ച് ഒരു ചതുര്ഭുജം രൂപീകരിച്ചിരിക്കുന്നു.ത്രികോണം ABC യുടെ വശങ്ങള് 48 , 20 , 52 വീതമാണ്.ത്രികോണം ACD യുടെ വശങ്ങള് 52 , 39 , 65 വീതമാണ്.

കാഡ്ബോഡില് തീര്ത്ത ഒരു രൂപമായി ഇതിനെ കണക്കാക്കുക.D യില്നിന്നും ഒരു കല്ല് താഴെയ്ക്കിടുന്നു. AB എന്ന വശത്ത് കല്ല് വന്നുപതിക്കുന്നത് E യിലാണ്. A യില്നിന്നും എത്ര അകലെയാണ് E യുടെ സ്ഥാനം?
പരിശീലന ചോദ്യങ്ങള്ക്കായി ഇവിടെ ക്സിക്ക് ചെയ്യുക

Sabtu, 27 November 2010
MST209 - Overview Blocks Units
I'll be doing MST209 next year. It is the most logical choice after MST121, MS221 and M208 the courses I have done sofar. The course looks quite interesting if you ask me. I already studied some topics based on the OpenLearn version of MST209 supported by corresponding MIT 18.02 / 18.03 video lectures. Although I don't study mathematics because of the stuff offered in MST209 I accept that MST209 is part of the mathematical language shared by all scientists ( and engineers ). Besides that MST209 is packed with examples I can play with in Mathematica, do some Mathematica programming as well.
Since I don't have the course materials yet ( haven't even registered yet ) I made a simple planning in a spreadsheet. Blocks / Units as rows, weeks as columns. The TMA cut-offs are estimated based on M208 data of this year. My study 'capacity' in net study hours is roughly as follows on a weekly basis.
NET STUDY(=RESOURCE) CAPACITY
Total 24hrs or 90P / year. ( Read: Work + Study and do nothing else. )
I scheduled the MST209 data in the schedule and it fits very well. I usually work two weeks on a TMA. Because I use LaTeX, do a lot of quality-checks, and start asap on a TMA, which means I might need to study stuff while working on the TMA. Anyway this means that I have two weeks to study a block, 5 Units or roughly 20 sections, do exercises, etc. You all know the drill.
Working on a degree is basically an excuse for spending time on math. In most circles it is considered anything between nerdy, nutty and plain vanilla crazy. ( Ignorance is NOT bliss. ) I am just explaining that my plan objective is not completing the project at the earliest possible date.
I have the following options.
- Blank MST209
- MST209 + M381 Number theory and logic ( As in my original overall plan )
- MST209 + M337 Complex analysis
- MST209 + MST326 Mathematical methods and fluid mechanics
My next step is, based on my study and OU experiences sofar, trying to 'fit in' another 30 point course ( any course for that matter ). If ( and only if ! ) that works I have to choose which module I will do next to MST209.
What's in MST209 :
Since I don't have the course materials yet ( haven't even registered yet ) I made a simple planning in a spreadsheet. Blocks / Units as rows, weeks as columns. The TMA cut-offs are estimated based on M208 data of this year. My study 'capacity' in net study hours is roughly as follows on a weekly basis.
NET STUDY(=RESOURCE) CAPACITY
| Mon | Tue | Wed | Thu | Fri | Sat | Sun | Total |
| 2 | 6 | 2 | 2 | - | 6 | 6 | = 24 |
Total 24hrs or 90P / year. ( Read: Work + Study and do nothing else. )
I scheduled the MST209 data in the schedule and it fits very well. I usually work two weeks on a TMA. Because I use LaTeX, do a lot of quality-checks, and start asap on a TMA, which means I might need to study stuff while working on the TMA. Anyway this means that I have two weeks to study a block, 5 Units or roughly 20 sections, do exercises, etc. You all know the drill.
Working on a degree is basically an excuse for spending time on math. In most circles it is considered anything between nerdy, nutty and plain vanilla crazy. ( Ignorance is NOT bliss. ) I am just explaining that my plan objective is not completing the project at the earliest possible date.
I have the following options.
- Blank MST209
- MST209 + M381 Number theory and logic ( As in my original overall plan )
- MST209 + M337 Complex analysis
- MST209 + MST326 Mathematical methods and fluid mechanics
My next step is, based on my study and OU experiences sofar, trying to 'fit in' another 30 point course ( any course for that matter ). If ( and only if ! ) that works I have to choose which module I will do next to MST209.
What's in MST209 :
BLOCK-1
Unit 1 Getting Started
This unit focuses mainly on mathematical techniques, but also covers some examples involving skills in the application of mathematics.
Unit 2 First-order Differential Equations
This unit considers in detail how a differential equation arises in a mathematical model with basic definitions and terminology associated with differential equations and their solutions.
Unit 3 Second-order Differential Equations
This unit considers second-order differential equations, that is, differential equations that involve a second (but no higher) derivative.
Unit 4 Vector Algebra
We often need to represent physical quantities such as mass, force, velocity, acceleration, time, etc., mathematically. Most of the physical quantities that we need can be classified into two types: scalars and vectors. This unit defines a vector and discusses ways of representing vectors in two and three (or more) dimensions. Also considered are ways of operating on and combining vectors - that is, they provide the fundamentals of vector algebra.
BLOCK-2
Unit 5 Statics
This unit and unit 6 lay the foundations of the subject of mechanics. Mechanics is concerned with how and why objects stay put, and how and why they move. This unit considers how and why they move. This unit assumes a good working knowledge of vectors.
Unit 6 Dynamics
Continuing on from Unit 5 this unit considers how and why objects move and outlines the procedure for solving dynamics problems. There is a video sequence associated with section 2 of this unit and is available on the DVD (order code MST209/DVDR01).
Unit 7 Oscillations
All around you there are mechanical systems that vibrate or oscillate. Each day you probable experience oscillations in a wide variety of forms: the buzzing of an alarm clock, the vibrations of an electric hair-drier or razor, the sideways movements of a train or boat, and so on. This unit describes a simple experiment involving an oscillating system, introduces Hooke's law as a model for the force exerted by a spring, and goes on to consider how this law applies in various situations where no movement takes place. It also shows how to use Newton's second law to model the oscillations of the simplest oscillating system, which consists of a single particle attached to a single horizontal spring.
Unit 8 Energy and Consolidation
This unit consolidates the mechanics covered in the previous units and introduces the topic of energy in mechanical systems.
BLOCK-3
Unit 9 Matrices and Determinants
This unit examines some of the properties and applications of matrices. It introduces the matrix method of solving large systems of linear equations, called the Gaussian elimination method, and explains the conditions required for this method to work.
Unit 10 Eigenvalues and Eigenvectors
This unit introduces eigenvectors showing simplified problems. It considers the eigenvectors and eigenvalues associated with various linear transformations of the plane and outlines situations where eigenvectors and eigenvalues are useful.
Unit 11 Systems of Differential Equations
This unit focuses on systems of linear differential equations relating two more functions and their derivatives. It shows how various situations can be modelled by a system of linear differential equations, how such a system can be written in matrix form, and how eigenvalues and eigenvectors can be used to solve it when the equations are homogeneous with constant coefficients.
Unit 12 Functions of Several Variables
This unit extends the calculus of functions of one variable to functions of several variables. It also discusses the application of functions of several variables to mechanics.
BLOCK-4
Unit 13 Modelling with Non-linear Differential Equations
In this unit we study the mathematical models associated with two physical systems: the growth of two interacting populations, one a predator and the other its prey and the motion of a rigid pendulum.
This is demonstrated through the use of Lotka-Volterra equations, which apply to a pair of interacting populations. How these equations can be linearized near an equilibrium state and the graphical representation of the solutions are discussed.
Unit 14 Modelling Motion in Two and Three Dimensions
This unit turns the attention to motion and forces in more than one dimension. It draws on ideas about vectors, forces and component forces and fundamental ideas about mechanics of particles, in particular Newton's second law. There is also mention of kinetic energy and potential energy. The video sequences associated with this unit are available on the DVD (order code MST/209/DVDR01), however it is not essential for you to view these.
Unit 15 Modelling Heat Transfer
This unit makes use of ideas relating to energy and first-order differential equations. It begins by developing models that could be used to answer questions such as the following.
How much does it cost to heat up a tank full of hot water?
What thickness of insulation should be applied to a hot-water tank?
What thickness of insulation should I use in my loft, and what savings would I make over a year?
What should the gap be in double-glazing?
Is it better to insulate the roof, insulate the walls or double-glaze the windows of my house?
The common factor in answering all these questions is the need to consider the transfer of heat energy between different regions of space. This unit introduces the basic ideas of heat energy and temperature. It discusses conduction and convection as well as a third mode of heat energy transfer, radiation.
Unit 16 Interpretation of Mathematical Models
This unit introduces the ideas of mathematical modelling. It discusses the five key stages of the mathematical modelling process in detail and looks at dimensions and units of physical quantities to see how they can be used to predict and check the outcomes of the modelling process.
BLOCK-5
Unit 17 Damping, Forcing and Resonance
This unit refers back to the contents of several earlier units. In particular it builds upon and extends the model of simple harmonic motion and uses this approach in analysing one-dimensional motion. It also returns to the concept of a resistance force proportional to the velocity of a particle.
Unit 18 Normal Modes
This unit continues with the theme of mechanics, in particular, it builds on earlier units that dealt with oscillations. In order to solve the equations of motion derived for the mechanical systems studied, it uses the methods used for solving systems of differential equations. This unit also draws heavily on the discussions regarding eigenvalues and eigenvectors.
Unit 19 Systems of Particles
The main objective of this unit is to show how to obtain useful information on the complicated motion of an object or system, and demonstrates that the concept of centre of mass is crucial to this process.
Unit 20 Circular Motion
The theme of this unit is rotational motion. It concentrates mainly on analysing the circular motion of a particle. This can be used to model a wide range of situations, such as a child on a swing, the pendulum of a clock and a chair-o-plane roundabout at a fairground. This unit builds on many of the ideas from earlier units mainly: polar coordinates, vectors, torque and Newton's second law.
BLOCK-6
Unit 21 Fourier Series
This unit is concerned with the technique of expressing a periodic function as a sum of terms, where each term is a constant, a sine function or a cosine function. This unit assumes you have a background knowledge of the definition of the period (unit 7), forced oscillations and resonance (Unit 17, and integration by parts (Unit 1).
Unit 22 Partial Differential Equations
This unit builds on ideas previously introduced in unit 12 regarding The diffusion equation and the wave equation, in the context of modelling the vibrations of a taut string (such as guitar string).
Unit 23 Scalar and Vector Fields
The main focus of this unit is the differential calculus of scalar and vector fields, i.e. the study of how scalar and vector fields vary from one point to another. A brief introduction to the properties of orthogonal matrices and pictorial representations of scalar and vector fields is given along with an extended discussion of the gradient function of a scalar field. Cylindrical and spherical polar coordinate systems for specifying points in three dimensions is also introduced in this unit.
Unit 24 Vector Calculus
This unit discusses the divergence of a vector field, the curl of a vector field, the scalar line integral and linking line integrals curl and gradient. This unit also builds on the concepts of kinetic energy and potential energy.
BLOCK-7
Unit 25 Multiple Integrals
This unit generalises the idea of an integral still further to deal with two and three dimensions by introducing two new kinds of integrals, called area integrals and volume integrals. How area integrals can be evaluated as combinations of two ordinary integrals, is shown and applications of area integrals, including the evaluation of centres of mass of planar (i.e. two-dimensional) objects are described. How volume integrals can be expressed as combinations of three ordinary integrals and how area integrals can be used to compute the area of a curved surface are also demonstrated.
Unit 26 Numerical methods of Differential Equations
This unit introduces the study of numerical methods for differential equations. It covers the Taylor's theorem with exercises, recaps Euler's method for solving initial-value problems involving first-order differential equations and goes on to explain that more efficient methods exist. Three new methods known as Runge-Kutta methods, are derived and a way of determining how small the step size h would need to be in order to achieve a given accuracy for a given initial-value problem is established.
Unit 27 Rotating Bodies and Angular Momentum
This unit deals with the motion of extended bodies, and in particular with their rotational motion. Rotating bodies, Angular momentum, Rigid-body rotation about a fixed axis and rotation about a moving axis are all covered in this unit.
Unit 28 Planetary Orbits
This unit shows how Newton's laws of motion and Newton's law of universal gravitation can be used to predict the orbits of planets around the Sun. In particular, it shows that Kepler's laws of planetary motion can be derived using Newtonian mechanics.
Watched MIT 18.02 - lecture 11
In 18.02 lecture 11 Prof. Denis Aroux talks about differentials and the Chain Rule. Two of the examples used to illustrate the main topic are of particularly interesting: a new proof for the differentiation of products and quotients, and the conversion between rectangular and polar coordinates.
A main result of this lecture is $$df = f_u \frac{du}{dx} + f_v \frac{dv}{dx},$$ where $f$ is a function of two variables $u,v$ which are both dependent on $x$, and $f_u, f_v$ are partial derivatives. The quotient rule can be derived from this result as follows. Let $g(x) = \frac{u}{v}$, with $u,v$ both dependent on $x$ :
$\begin{align*}
df &=f_u \frac{du}{dx}+f_v \frac{dv}{dx} \\
&= \frac{1}{v}\frac{du}{dx}-\frac{u}{v^2}\frac{dv}{dx} \\
&= \frac{ v \frac{du}{dx}-u \frac{dv}{dx} }{v^2}
\end{align*} $
The last expression is the quotient rule for differentiation.
This lecture inspired me to some experimentation ( play ) with Mathematica's PolarPlot function. A polar coordinate is in fact a function of two variables $x,y$ which are both dependent on $r$ and $\theta$ with $x=r \cos(\theta)$, $y=r \sin(\theta)$. By applying the theory above one suddenly gets control over geometric objects like this:
Finally the concept of a gradient was mentioned which is merely a vector of partial derivatives. Gradients are the topic of lecture 12. I designed some problems and exercises ( and other experiments ) for functions in polar coordinates. I am delighted I feel more able in that regard.
A main result of this lecture is $$df = f_u \frac{du}{dx} + f_v \frac{dv}{dx},$$ where $f$ is a function of two variables $u,v$ which are both dependent on $x$, and $f_u, f_v$ are partial derivatives. The quotient rule can be derived from this result as follows. Let $g(x) = \frac{u}{v}$, with $u,v$ both dependent on $x$ :
$\begin{align*}
df &=f_u \frac{du}{dx}+f_v \frac{dv}{dx} \\
&= \frac{1}{v}\frac{du}{dx}-\frac{u}{v^2}\frac{dv}{dx} \\
&= \frac{ v \frac{du}{dx}-u \frac{dv}{dx} }{v^2}
\end{align*} $
The last expression is the quotient rule for differentiation.
This lecture inspired me to some experimentation ( play ) with Mathematica's PolarPlot function. A polar coordinate is in fact a function of two variables $x,y$ which are both dependent on $r$ and $\theta$ with $x=r \cos(\theta)$, $y=r \sin(\theta)$. By applying the theory above one suddenly gets control over geometric objects like this:
 |
| Click to enlarge |
Finally the concept of a gradient was mentioned which is merely a vector of partial derivatives. Gradients are the topic of lecture 12. I designed some problems and exercises ( and other experiments ) for functions in polar coordinates. I am delighted I feel more able in that regard.
Kamis, 25 November 2010
ഒന്പതാം ക്ലാസുകാരിയുടെ കവിത

ഇന്ന് മാത്സ് ബ്ലോഗ് അവതരിപ്പിക്കുന്നത് പാലക്കാട് ജില്ലയിലെ തൃത്താലയിലുള്ള ആനക്കര ജി.എച്ച്.എസ്.എസിലെ ഒന്പതാം ക്ലാസുകാരിയും അധ്യാപകദമ്പതികളുടെ മകളുമായ എസ്.അനഘയുടെ രണ്ടു കവിതകളാണ്. സ്ക്കൂളിലെ അധ്യാപകനായ ഉസ്മാന് സാറിന്റെ സാക്ഷ്യപ്പെടുത്തലോടെ കഴിഞ്ഞ മാസത്തില് മാത്സ് ബ്ലോഗിന്റെ മെയില് ബോക്സില് കറുത്ത വെളിച്ചം എന്ന കവിത പ്രസിദ്ധീകരണത്തിനായി ലഭിച്ചതിലൂടെയാണ് മാത്സ് ബ്ലോഗ് ഈ പ്രതിഭാ വിലാസം തിരിച്ചറിഞ്ഞത്. ഈ ചെറുപ്രായത്തില്ത്തന്നെ അനഘയുടെ തൂലിക ഒട്ടേറെ കവിതകള്ക്ക് ജന്മം നല്കിക്കഴിഞ്ഞു. സ്വന്തം കവിതകള് പ്രസിദ്ധീകരിക്കാന് മന്ദാരം എന്ന പേരില് ഒരു ബ്ലോഗ് തന്നെയുണ്ട് ഈ കൊച്ചു മിടുക്കിക്ക്. മലപ്പുറം ജില്ലയിലെ എടപ്പാള് സ്വദേശിയാണ്. പോസ്റ്റ് ഒരുക്കുന്നതിനു വേണ്ടി മന്ദാരത്തിലുടെ സഞ്ചരിച്ചപ്പോള് ബ്ലഡ്ടെസ്റ്റ് എന്ന പേരില് ഒരു കവിത കണ്ടു. കവയിത്രിയെക്കുറിച്ച് കൂടുതലറിയാന് ഈ കൊച്ചു കവിത സഹായിക്കുമെന്നുള്ളതുകൊണ്ടുതന്നെ അനുവാദമില്ലാതെ ആ കവിത ഇവിടെ പ്രസിദ്ധീകരിക്കുന്നു. അത് ഇങ്ങനെയായിരുന്നു.
മഴ കൊടുത്ത പാരസെറ്റമോള് ഫലിക്കാത്തതുകൊണ്ടാണ്
ഭൂമിയെ ഹോസ്പിറ്റലില് കൊണ്ടുപോയത്.
ബ്ലഡ് ടെസ്റ്റ് ചെയ്യാന് സൂചി കൊണ്ട് കുത്തിയപ്പോള്
ഡോക്ടര്ക്കത് മനസ്സിലായി
കുത്തിയെടുക്കാന് ഇനി ചോരയൊന്നും ബാക്കിയില്ല !
ഈ കവിത വായിച്ചപ്പോള് എന്തു തോന്നി? നിങ്ങളുടെ അഭിപ്രായങ്ങള് ഒരു കമന്റായി കുറിക്കുമല്ലോ. പ്രായത്തിനതീതമായ ചിന്തകള് അഗ്നിച്ചിറകുകളുമായി പാറിനടക്കുന്നുവെന്ന് ഒട്ടും ആലങ്കാരികമല്ലാത്ത ഭാഷയില് പറയാന് ഈ കവിത എനിക്ക് ധൈര്യം തരുന്നു. യഥാര്ത്ഥത്തില് സമൂഹത്തിലെ തിന്മകളോടുള്ള ഒരു പടയൊരുക്കമല്ലേ ഈ കവിത? ആത്മാവിഷ്ക്കാരത്തിനുള്ള മികച്ചൊരു ഉപാധി നിലയില് മാത്രമല്ല, ചില സമയങ്ങളില് കവിതകളെ അവള് ഒരു ആയുധമായി ഉപയോഗിക്കുന്നുണ്ടെന്ന് പോലും തോന്നി. ഒറ്റവായനയില് ഒതുക്കിത്തീര്ക്കാവുന്നതല്ല അനഘയുടെ കവിതയിലെ ഉള്ളടക്കം. ഓരോ തവണ വായിക്കുമ്പോഴും പുതുതായി എന്തെല്ലാമോ പറയാന് കവിതയിലെ വരികള് ശ്രമിക്കുന്നതായി തോന്നി. ഭാവിയുടെ വാഗ്ദാനമായ അനഘയെക്കുറിച്ച് നമ്മുടെ അധ്യാപകര് അറിയണമെന്നും അത്തരത്തില് തങ്ങളുടെ വിദ്യാര്ത്ഥികളെ വളര്ത്തിയെടുക്കാന് പരിശ്രമിക്കും എന്ന പ്രതീക്ഷയില് അടുത്ത കവിത താഴെ കൊടുത്തിരിക്കുന്നു.
ചിമ്മിനി കെട്ടപ്പോള് മുറിയില് വെളിച്ചം പരന്നു
കറുത്ത വെളിച്ചം..!
കറുത്ത വെളിച്ചത്തില് കറുത്തതെല്ലാം
തെളിഞ്ഞു കണ്ടു
രക്തമൂറ്റിക്കുടിക്കുന്ന രക്ഷസ്സിന്റെയും
കവര്ന്നെടുക്കുന്ന കള്ളന്റെയും
വിഹാരം ഈ വെളിച്ചത്തിലല്ലേ
ഒന്നുമറിയാത്ത കുഞ്ഞുഭൂമിയെ
പ്രപഞ്ചത്തിന്റെ നടുക്ക്
പിടിച്ചിരുത്തിയവരുടെ മനസ്സിലും
ഈ കറുത്ത വെളിച്ചം തന്നെ
കുഴലും പിടിച്ചു വാനം നോക്കികളിച്ച
ഒരു പാവം വയസ്സന്റെ കണ്ണില്
ഈ വെളിച്ചം ഉണ്ടായിരുന്നില്ല
അതുകൊണ്ടാവാം
ഇരുട്ടത്തുനിന്നുകൊണ്ട് ആരോ അങ്ങേരെ
'അന്ധനെന്ന്' വിളിച്ചു
നിങ്ങളുടെ കമന്റുകള് വളര്ന്നു വരുന്ന ഈ തൂലികയ്ക്ക് ബലമേകുമെന്നു തീര്ച്ച. സമൂഹത്തിലെ തിന്മകള്ക്കെതിരെ നാം പറയേണ്ടതാവും നാളെ ഇവളിലൂടെ പുറത്തു വരിക. അതിനവളെ നാം പ്രോത്സാഹിപ്പിച്ചേ പറ്റൂ. അഭിപ്രായങ്ങള്ക്കായി മാത്സ് ബ്ലോഗും അനഘയും കാത്തിരിക്കുന്നു.
Watched MIT 18.02 - lectures 9,10
The Second Derivative Test is a procedure for determining if a critical point is a maximum, a minimum, a saddle or a degenerate.
PROCEDURE:
- Calculate $f_x, f_y, f_{xx}, f_{xy}, f_{yy}$
- Calculate the critical points ;
Then for each critical point:
- Calculate $A = f_{xx}(x_0, y_0)$
- Calculate $B = f_{xy}(x_0, y_0)$
- Calculate $C = f_{yy}(x_0, y_0)$
- $AC-B^2$.
Apply the Second Derivative Test
If $AC-B^2 > 0$ and $A > 0$ minimum
If $AC-B^2 > 0$ and $A < 0$ maximum
If $AC-B^2 < 0$ saddle
If $AC-B^2 = 0$ degenerate

EXAMPLE:
( See Mathematica print )
$f(x,y)=e^{x^2-\frac{x^4}{4}-y^2}$
At $(0,0): \left\{AC-B^2, A\right\} = \left\{-4,2\right\}$
Saddle.
At $(-\sqrt{2},0): \left\{AC-B^2, A\right\} = \left\{8e^2,-4e\right\}$
Local maximum.
At $(\sqrt{2},0): \left\{AC-B^2, A\right\} = \left\{8e^2,-4e\right\}$
Local maximum.
.
PROCEDURE:
- Calculate $f_x, f_y, f_{xx}, f_{xy}, f_{yy}$
- Calculate the critical points ;
Then for each critical point:
- Calculate $A = f_{xx}(x_0, y_0)$
- Calculate $B = f_{xy}(x_0, y_0)$
- Calculate $C = f_{yy}(x_0, y_0)$
- $AC-B^2$.
Apply the Second Derivative Test
If $AC-B^2 > 0$ and $A > 0$ minimum
If $AC-B^2 > 0$ and $A < 0$ maximum
If $AC-B^2 < 0$ saddle
If $AC-B^2 = 0$ degenerate

Click to enlarge
EXAMPLE:
( See Mathematica print )
$f(x,y)=e^{x^2-\frac{x^4}{4}-y^2}$
At $(0,0): \left\{AC-B^2, A\right\} = \left\{-4,2\right\}$
Saddle.
At $(-\sqrt{2},0): \left\{AC-B^2, A\right\} = \left\{8e^2,-4e\right\}$
Local maximum.
At $(\sqrt{2},0): \left\{AC-B^2, A\right\} = \left\{8e^2,-4e\right\}$
Local maximum.
.
Marcus du Sautoy on Symmetry ( Explained )
If you watched du Sautoy's talk on symmetry I posted yesterday and your background in Group Theory matches MS221 or M208 you might have lost him when he was talking about the symmetries found in the Alhambra. Let me explain.
These symmetry groups are called the Wallpaper Groups and they are part of the Open University Course M336 Groups and Geometry. Although there are only 17 wallpaper groups ( mathematical proof in M336 ) recognizing them in nature or in a piece of art is difficult. Well, it takes practice. This beautiful applet ( Java required on your PC ) lets you experiment with the wallpaper groups. Some theoretical background can be found here.
Enjoy!
Rabu, 24 November 2010
Watched MIT 18.02 - Lecture 8
A lecture in which Prof. Denis Auroux says: "Applied mathematics is physics with a different set of symbols." To the math.
Lecture 8 starts a new unit in the 18.02 series and is about functions of several variables, the graph of a function of two variables, contour plots of functions of two variables and partial derivatives.

The image above shows the graph and the contour plot of $f(x,y)=1-(x^2+y^2)$ followed by the partial derivatives as calculated by Mathematica.
Partial derivatives are defined as follows:
$$\frac{\partial f}{\partial x}(x,y) = \displaystyle\lim_{\Delta x \to 0}\frac{f(x+\Delta x, y) - f(x,y)}{\Delta x}$$
$$\frac{\partial f}{\partial y}(x,y) = \displaystyle\lim_{\Delta y \to 0}\frac{f(x, y+\Delta y) - f(x,y)}{\Delta y}$$
.
[News] - London: More student protests
London, 24 nov 2010
Students protest against fees trebling from GBP 3000 to GBP 9000.
Students protest against fees trebling from GBP 3000 to GBP 9000.
[Video] - Marcus du Sautoy on Symmetry
A talk on Symmetry by Marcus du Sautoy.
Marcus du Sautoy is also the narrator of the beautiful BBC - Open University co-production "The story of maths" which is a 4 hour documentary ( in 4 parts ) accompanying the OU course TM190 The story of maths. ( Level 1 / 10 points / 1 CMA only ).
Marcus du Sautoy is also the narrator of the beautiful BBC - Open University co-production "The story of maths" which is a 4 hour documentary ( in 4 parts ) accompanying the OU course TM190 The story of maths. ( Level 1 / 10 points / 1 CMA only ).
Selasa, 23 November 2010
[TIP] - Join a Study Group
I joined an MIT 18.02 Online Study Group since I think 18.02 and MST209 have many similar topics. There are several other Study Groups as well. If you have a Facebook account you can login with your Facebook Id.
http://openstudy.com/
MIT 18.02 Study Group
http://openstudy.com/
MIT 18.02 Study Group
Matematika itu ....
Kalau anda berpikir bahwa matematika itu ngga asyik, ....Kalau anda berpikir bahwa matematika itu ngebosenin, ....Kalau anda berpikir bahwa matematika itu cuma bikin bete, ....Kalau anda berpikir bahwa matematika itu MAkin TEkun MAkin TIdak KAruan, ....Kalau anda berpikir bahwa matematika itu cuma berisi hal - hal yang tidak menyenangkan karena cuma berisi rumus, angka, logika yang ngejlimet,
Senin, 22 November 2010
Trig Visualizing

The lesson is a bit of a stretch, because we're just touching on one section, using a bit of information from three or four. We did unit planning one week, lesson planning the next week, and finally the lesson. The TAs read The Teaching Gap, so then we connected it to the idea of lesson study, and a discussion both about how to revise this lesson, and why lesson study might work as professional development.
We have two Geogebra sketches to help with visualization.


This is my first attempt at a WCYDWT. When I was making these sketches (don't worry, I disinfected them before posting) I had a bad cold, so was constantly reheating my tea. Watching it go round and round. Thinking, "so when do we know a position and want to know the angle, with possible multiplicities...hey, wait a second." If I was using this, I think I would start with the video, and use that to motivate the idea of solving for information based on the circle position, as well as how periodicity relates to multiple solutions.
This has to be the world's most boring video. Enjoy!
Here's a slightly more polished version of the handout we used with the sketches. There was some discusssion with the student teachers as to whether the inverse trig or the algebraic solutions part should come first. I think they could be switched, depending on what you wanted to emphasize with the students and how strong their trig background is. Also, the handout is written as if the teacher is demonstrating with the computer, which is what we wanted to model for them, (no lab is no reason to no have technology) but the ideal would be to have the students have access to the sketches.
Trig Visualizing
The lesson is a bit of a stretch, because we're just touching on one section, using a bit of information from three or four. We did unit planning one week, lesson planning the next week, and finally the lesson. The TAs read The Teaching Gap, so then we connected it to the idea of lesson study, and a discussion both about how to revise this lesson, and why lesson study might work as professional development.
We have two Geogebra sketches to help with visualization.
This is my first attempt at a WCYDWT. When I was making these sketches (don't worry, I disinfected them before posting) I had a bad cold, so was constantly reheating my tea. Watching it go round and round. Thinking, "so when do we know a position and want to know the angle, with possible multiplicities...hey, wait a second." If I was using this, I think I would start with the video, and use that to motivate the idea of solving for information based on the circle position, as well as how periodicity relates to multiple solutions.
This has to be the world's most boring video. Enjoy!
Here's a slightly more polished version of the handout we used with the sketches. There was some discusssion with the student teachers as to whether the inverse trig or the algebraic solutions part should come first. I think they could be switched, depending on what you wanted to emphasize with the students and how strong their trig background is. Also, the handout is written as if the teacher is demonstrating with the computer, which is what we wanted to model for them, (no lab is no reason to no have technology) but the ideal would be to have the students have access to the sketches.
ജിയോജിബ്ര ട്യൂട്ടോറിയല് മൂന്നാം ഭാഗം
 ഒന്പതാം ക്ലാസ് രണ്ടാം ഭാഗത്തിന്റെ ജിയോജിബ്ര പാക്കേജ് പുറത്തിറങ്ങിയത് കണ്ടിരിക്കുമല്ലോ. അത് പാഠഭാഗത്തെ കുട്ടികളിലേക്ക് എളുപ്പത്തില് മനസ്സിലാക്കാന് സഹായിക്കുന്ന ഒന്നു തന്നെയാണ്. പക്ഷെ നമുക്ക് ക്ലാസില് പ്രദര്ശിപ്പിക്കാന് പറ്റുന്ന തരത്തില് ഇതെല്ലാം എങ്ങനെ തയ്യാറാക്കാനാകും. അതെക്കുറിച്ച് പ്രതിപാദിക്കുന്ന പഠനപരമ്പരയുടെ മൂന്നാം ഭാഗമാണ് എറണാകുളത്തെ മാസ്റ്റര്ട്രെയിനറായ സുരേഷ് ബാബു സാര് ഈ പാഠത്തിലൂടെ പറഞ്ഞിരിക്കുന്നത്. ആദ്യം ഒരു ന്യൂന (Acute) ത്രികോണത്തിന്റെ വിസ്തീര്ണ്ണം കാണുന്നതിനുള്ള ഒരു Applet നിര്മ്മാണം എങ്ങനെയാണെന്നു നോക്കാം. പാദം, ഉന്നതി എന്നിവയുടെ അളവുകള് സ്ലൈഡര് നീക്കുമ്പോള് മാറുന്നതിനനുസരിച്ചുള്ള ഒരു ന്യൂനത്രികോണമാണ് നമുക്ക് നിര്മ്മിക്കേണ്ടത്. കൂടാതെ മറ്റൊരു സ്ലൈഡര് നീക്കുമ്പോള് ഇതൊരു ചതുരമായി മാറുകയും വേണം. രേഖാഖണ്ഡംAB വരയ്ക്കുണം. AB യുടെ ഇടയില് ഒരു ബിന്ദു D അടയാള പ്പെടുത്തുക. D യിലൂടെ ലംബം വരയ്ക്കണം. ഉന്നതിയുടെ അളവില് D കേന്ദ്രമാക്കി ചാപം വരച്ച് ലംബരേഖയുമായി സംഗമിക്കുന്ന ബിന്ദുവിന് C എന്ന പേരു നല്കി CയുംA യും കൂടാതെ CയുംBയും യോജിപ്പിക്കണം. CD യുടെ മധ്യ ബിന്ദു Eഅടയാളപ്പേടുത്തി Eയിലൂടെ AB ക്ക് സമാന്തരമായി ഒരു രേഖ PQവരച്ച് അതിലൂടെ മുറിച്ചെടുക്കുന്നു. ഇപ്പോള് ലഭിക്കുന്ന ചെറിയ രണ്ട് ത്രികോണങ്ങള് ( CEP , CEQ) ശേഷിച്ച ഭാഗത്തിന്റെ PA, QB എന്നീ വശങ്ങളുമായി യഥാക്രമം CP , CQ എന്നീ വശങ്ങള് ചേരത്തക്കവിധം ചേര്ത്തുവയ്ക്കുമ്പോള് ഒരു ചതുരം (Rectangle ) ലഭിക്കും.
- Step 1. Open Geogebra
- Step 2. Hide Algebraic view and Axes.
- Step 3. Slider on Number ( Name, Interval [Minimum ; o or >o, maximum ; any number, Increment ; any number])
- Step 4. Line segment AB ( Segment with given length from point tool )
- Step 5. Mark a new Point D on AB ( New Point tool )
- Step 6. Perpendicular Line through D
- Step 7. Slider on Number ( Name, Interval [Minimum ; o or >o, maximum ; any number, Increment ; any number])
- Step 8. Draw a circle with centre at D - Circle with Centre and Radius tool – Radius ; Name of the above slider
- Step 9. Mark the new point C – Intersect two object tool
- Step 10. Draw CA and CB
- Step 11. Mark the mid point E of CD
- Step 12. Draw a line through E parallel to AB
- Step 13. Mark the intersecting points P and Q on AC and BC respectively.
- Step 14. Hide all the objects except the points A, B, C, E, P and Q.
- Step 15. Draw 3 polygons – ABQP, CEP and CEQ.
- Step 16. Slider on Angle - Interval : Minimum ; o, maximum ; 180, Increment ; 1
- Step 17. ഒമ്പതാമത്തെ ടൂള് ബോക്സില് നിന്നും Rotate Object around Point by Angle എന്ന ടൂളെടുത്ത് ആദ്യം CEQഎന്ന Polygon ന്റെ ഉള്ലിലും പിന്നീട് Q എന്ന ബിന്ദുവിലും ക്ലിക്ക് ചെയ്യുമ്പോള് വരുന്ന ഡയലോഗ് ബോക്സില് Angle 45o എന്നത് മാറ്റി സ്ലൈഡറിന്റെ പേര് ( വലതു വശത്തുനിന്നും സെലക്ട് ചെയ്യാം. ) നല്കുകയും Clockwise ബട്ടണില് ക്ലിക്ക് ചെയ്യുകയും ചെയ്തതിനു ശേഷം OK ബട്ടണില് ക്ലിക്ക് ചെയ്യുക. ഇപ്പോള് CEQ എന്ന ത്രികോണത്തിന്റെ ഒരു പകര്പ്പ് അവിടെ വന്നിട്ടുണ്ടാകും. CEQ എന്ന ത്രികോണത്തെ hide ചെയ്യാം.
- Sep 18. വീണ്ടും Rotate Object around Point by Angle എന്നടൂളെടുത്ത് ആദ്യം CEPഎന്ന Polygon ന്റെ ഉള്ലിലും പിന്നീട് P എന്ന ബിന്ദുവിലും ക്ലിക്ക് ചെയ്യുമ്പോള് വരുന്ന ഡയലോഗ് ബോക്സില് Angle 45o എന്നത് മാറ്റി സ്ലൈഡറിന്റെ പേര് ( വലതു വശത്തുനിന്നും സെലക്ട് ചെയ്യാം. ) നല്കുകയും Counter Clockwise ബട്ടണില് ക്ലിക്ക് ചെയ്യുകയും ചെയ്തതിനു ശേഷം OK ബട്ടണില് ക്ലിക്ക് ചെയ്യുക. ഇപ്പോള് CEP എന്ന ത്രികോണത്തിന്റെ ഒരു പകര്പ്പ് അവിടെ വന്നിട്ടുണ്ടാകും. CEP എന്ന ത്രികോണത്തെ hide ചെയ്യാം. അവസാനമുണ്ടാക്കിയ സ്ലൈഡര് ചലിപ്പിച്ച് മാറ്റം നിരീക്ഷിക്കൂ.

ബൃഹത് (Obtuse) ത്രികോണത്തിന്റെ വിസ്തീര്ണ്ണം കണ്ടുപിടിക്കുന്നതിനുള്ള അപ്ലറ്റ് തയ്യാറാക്കുന്നതിനുമുമ്പായി പുതിയ ടൂളുകള് കൂടി പരിചയപ്പെടാം.
ഡൈലേഷന്
ഒമ്പതാമത്തെ ടൂള് ബോക്സിലുള്ള Dilate Object from Point by Factor എന്ന ടൂളുപയോഗിച്ച് നമുക്ക് ഒരു രൂപത്തെ , ഒരു നിശ്ചിത ബിന്ദുവില് നിന്നുള്ള ദൂരം അടിസ്ഥാനമാക്കി വലുതാക്കുകയോ ചെറുതാക്കുകയോ ചെയ്യാവുന്നതാണ്.

ജിയോജിബ്ര ജാലകം തുറന്ന് ഒരു ത്രികോണം Polygon ടൂളുപയോഗിച്ച് വരയ്ക്കുക. തുടര്ന്ന് മറ്റൊരു ബിന്ദു അടയാളപ്പെടുത്തുക. Dilate Object from Point by Factor എന്ന ടൂളെടുത്ത് ആദ്യം ത്രികോണത്തിന്റെ ഉള്ളിലും പിന്നീട് ബിന്ദുവിലും ക്ലിക്ക് ചെയ്യുമ്പോള് വരുന്ന ഡയലോഗ് ബോക്സില് Number എന്നതില് ഏതെങ്കിലും ഒരു സംഖ്യ ( 0.5, 1, 1.5, 2, 3,....) നല്കി O K ബട്ടണില് ക്ലിക്ക് ചെയ്ത് മാറ്റം നിരീക്ഷിക്കൂ.
എത്ര മടങ്ങ് മാറ്റണം എന്ന് നാം നിര്ദ്ദേശിക്കുന്ന സംഖ്യയെ വേണമെങ്കില് ഒരു സ്ലൈഡര് ഉപയോഗിച്ച് നിയന്ത്രിക്കുകയുമാകാം. മുമ്പ് സൂചിപ്പിച്ച ഉദാഹരണത്തില് ഒരു സ്ലൈഡര് ഉണ്ടാക്കിയതിനുശേഷം (Slider on Number ( Name, Interval [Minimum ; o , maximum ; any number > 0, Increment ; any number]) Dilate Object from Point by Factor എന്ന ടൂളെടുത്ത് ആദ്യം ത്രികോണത്തിന്റെ ഉള്ളിലും പിന്നീട് ബിന്ദുവിലും ക്ലിക്ക് ചെയ്യുമ്പോള് വരുന്ന ഡയലോഗ് ബോക്സില് Number എന്നതില് സ്ലൈഡറിന്റെ പേര് നല്കി O K ബട്ടണില് ക്ലിക്ക് ചെയ്ത് മാറ്റം നിരീക്ഷിക്കൂ.
ട്രാന്സ്ലേഷന്
ഒമ്പതാമത്തെ ടൂള് ബോക്സിലുള്ള Translate Object by Vector എന്ന ടൂളുപയോഗിച്ച് നമുക്ക് ഒരു രൂപത്തിന്റെ പകര്പ്പ് , Vector നെ അടിസ്ഥാനമാക്കി തയ്യാറാക്കാം.
ജിയോജിബ്ര ജാലകം തുറന്ന് ഒരു ത്രികോണം Polygon ടൂളുപയോഗിച്ച് വരയ്ക്കുക.
മൂന്നാമത്തെ ടൂള് ബോക്സില് നിന്നും Vector betwen two Points എന്ന ടൂളെടുത്ത് Drawing Pad ല്രണ്ട് ബിന്ദുക്കളില് ക്ലിക്ക് ചെയ്യുമ്പോള് ഒരു Vector ലഭിക്കും.
Translate Object by Vector എന്ന ടൂളെടുത്ത് ആദ്യം Polygon ന്റെ ഉള്ളിലം പിന്നീട് Vector ലും ക്ലക്ക് ചെയ്യുമ്പോള് വരുന്ന മാറ്റം നിരീക്ഷിക്കൂ
പല അപ്ലറ്റുകളുടെ നിര്മ്മാണത്തിലും ഇത്തരം ടൂളുകള് (Rotatin, Dilation, Translation )ഉപയോഗിക്കാറണ്ട്.
സാമാന്തരിക (Parallelogram)ത്തിന്റെ വിസ്തീര്ണ്ണം കാണുന്നതിനുള്ള ഒരു Applet നിര്മ്മാണം (for Teachers)
സ്ലൈഡര് ചലിപ്പിക്കുമ്പോള് വ്യത്യസ്ത സാമാന്തരികങ്ങള് ലഭിക്കത്തക്കവിധമുള്ള ഒരു സാമാന്തരികം ABCD ജിയോജിബ്ര ടൂളുകളുപയോഗിച്ച് നിര്മ്മിക്കുക.

- Step 1. D യില് നിന്നും AB യിലേക്ക് ലംബം വരയ്ക്കുക. (Perpendicular Line tool)
- Step 2. ലംബം AB യുമായി സംഗമിക്കുന്ന ബിന്ദു E അടയാളപ്പെടുത്തുക. (Intersect Two Objects)
- Step 3. A, B, C, D, E എന്നീ ബിന്ദുക്കളൊഴികെയുള്ള എല്ലാ object കളും hide ചെയ്യുക.
- Step 4. Polygon ടൂളുപയോഗിച്ച് AED എന്ന മട്ടത്രികോണവും, EBCD എന്ന ലംബകവും വരയ്ക്കുക.
- Step 5. Slider on Number ( min: 0, max : 1, incre : 0.001)
- Step 6. Dilate Object from Point by Factor എന്ന ടൂളെടുത്ത് ആദ്യം B യിലും പിന്നീട് A യിലും ക്ലിക്ക് ചെയ്യുമ്പോള് വരുന്ന ഡയലോഗ് ബോക്സില് ഇപ്പോള് തയ്യാറാക്കിയ സ്ലൈഡറിന്റെ പേര് നല്കി O K ബട്ടണ് ക്ലിക്ക് ചെയ്തതിനുശേഷം സ്ലൈഡര് ചലിപ്പിച്ചുനോക്കൂ. A യുടേയും B യുടേയും ഇടയില് ഒരു പുതിയ ബിന്ദു F നീങ്ങുന്നതു കാണാം.
- Step 7. മൂന്നാമത്തെ ടൂള് ബോക്സില് നിന്നും Vector between Two Points എന്ന ടൂളെടുത്ത് ആദ്യം A യിലും പിന്നീട് Fലും ക്ലിക്ക് ചെയ്യുമ്പോള് അവിടെ ഒരു Vector വന്നിട്ടുണ്ടാകും. സ്ലൈഡര് ചലിപ്പിച്ചുനോക്കൂ.
- Step 8. Translate Object by Vector എന്ന ടൂളെടുത്ത് ആദ്യം AED എന്ന Polygon ന്റെ ഉള്ളിലും പിന്നീട് Vector ലും ക്ലിക്ക് ചെയ്യുമ്പോള് Vector ന്റെ Terminal Point ല് AED എന്ന Polygon ന്റെ ഒരു പകര്പ്പ് വന്നിട്ടുണ്ടാകും.
- Step 9. AED എന്ന Polygon ഉം Vector ഉം hide ചെയ്ത് സ്ലൈഡര് ചലിപ്പിച്ചുനോക്കൂ.

ബൃഹത് (Obtuse) ത്രികോണത്തിന്റെ വിസ്തീര്ണ്ണം കാണുന്നതിനുള്ള ഒരു അപ്ലറ്റ് Slider, Rotation, Dilation, Translation തുടങ്ങിയ ടൂളുകളുപയോഗിച്ച് തയ്യാറാക്കാം.
More on MST209 in relation to MIT video lectures
MIT has a video lecture series on multivariable calculus: 18.02, which is in fact a prerequisite for 18.03. I looked further into the topics of MST209 and I now think that 18.02 is a much better preparation for MST209 than 18.03.
It's more or less like this:
MST209 = 18.02 + ( part of ) 18.03
MST209 + MST326 = 18.02 + 18.03
18.02 has lectures on
Lecture 15: Partial Differential Equations
Lecture 16: Double Integrals
Lecture 19: Vector Fields
Lecture 21: Gradient Fields
Lecture 25: Triple Integrals
Lecture 27: Vector Fields in 3D
Lecture 30: Line Integrals
which are topics in MST209.
18.02 Multivariable Calculus
M203/M208 Exam Results 2006-2009
M203/M208
Took exam: Exam candidates / Final Registrations
Pass: Candidates passed / Exam candidates
Source: Open University
| Year | Took exam | Pass |
| 2006 | 69% | 92% |
| 2007 | 71% | 90% |
| 2008 | 69% | 93% |
| 2009 | 67% | 92% |
Took exam: Exam candidates / Final Registrations
Pass: Candidates passed / Exam candidates
Source: Open University
Minggu, 21 November 2010
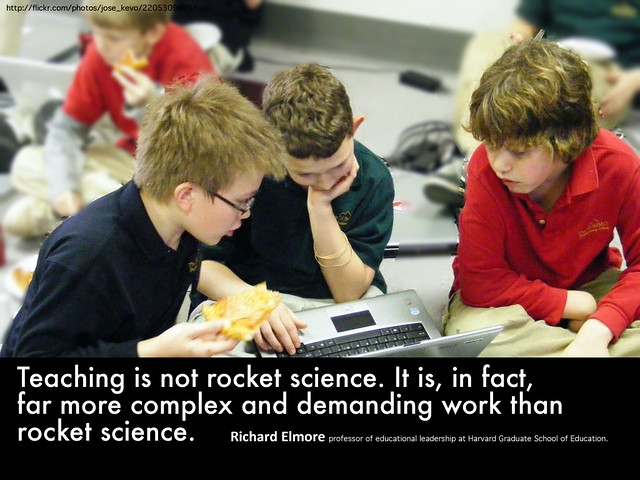
Images of Teaching
There was a nice (if long-windedly titled) article in the Decemeber '03 Teaching Children Mathematics called "Metaphors as a Vehicle for Exploring Preservice Teachers' Perceptions of Mathematics," by Brenda Wolodoko, Katherine Wilson and Richard Johnson. In the article the preservice teachers made images to display themselves as teachers or learners of mathematics. The majority of their images revealed anxieties about the content as learners, but hope for themselves as teachers. The researchers liked the way that the images created an opportunity for dialogue and created a potential for change. One interesting sidenote is that students used the idea of puzzles both positively and negatively, modeling both frustration and engagement.
My preservice elementary teachers recently made images of what does it mean to teach mathematics in small groups, and our secondary student teachers envisioned their future classrooms. There were many neat ideas to share.
 The mullet came later, but I think they thought the "Business in the front, party in the back," slogan did relate to teaching.

This and the next chart were imagined classrooms, which you'll see a lot of with the secondary teachers as well. They value group work, technology, manipulatives and whole class time. I often wish college classrooms had room for a carpet section for students to sit down.

 These next two charts are more like concept maps. This group focused on the most important aspects to them.

While this group saw their concept map evolving into a hierarchy. There's some pretty interesting connections here to look into.
Somehow missed my favorite poster here. Clever use of Facebook, and really made me think about that page as a representation of who someone is. I think there are lots of idealized people I'd be interested in seeing Facebook pages for.

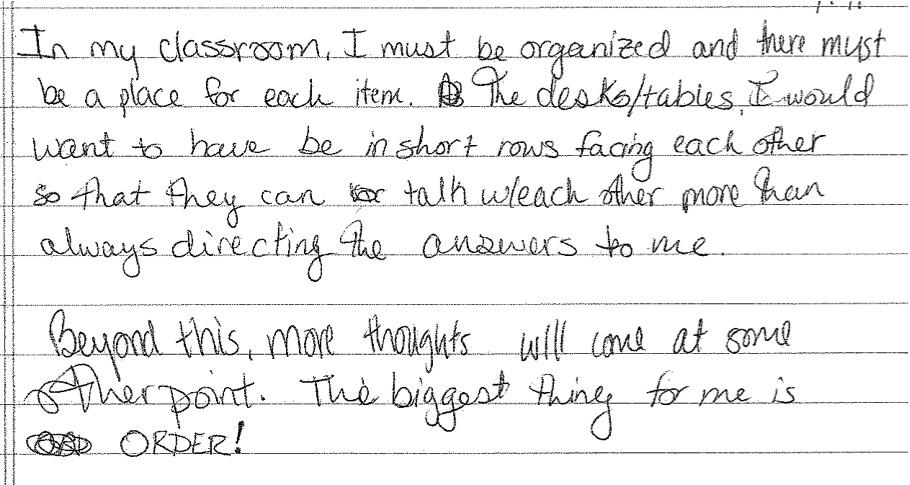
The secondary teacher assistants made quick individual sketches at the end of a seminar. So don't expect the artistic commitment we got from the elementary teachers. One thing that came across in classroom images is the presence of the kind of technology to which they've been exposed. It's becoming clear to me that we need to do a better job of teaching technological pedagogical content knowledge, primarily by explicit modeling.
 Let's start off with a few of the text descriptions. This teacher is worried about the content they will be forced to cover.

This teacher is thinking about classroom management as the start of learning.
 I'm not sure if this teacher was describing life as it is or as they envision. Somebody definitely considering the different models with which they've been presented.
Next come several visions of cooperative learning. There seems to be a clear value on student discussion, and varying images of what the teacher's role is in relation.


And this sketch merges a vision of the classroom with a concept map of what is important to them.
I'd be very interested in knowing what you think about the images here and what you notice, if you'd care to leave a comment or drop an email. Thanks!
My preservice elementary teachers recently made images of what does it mean to teach mathematics in small groups, and our secondary student teachers envisioned their future classrooms. There were many neat ideas to share.


This and the next chart were imagined classrooms, which you'll see a lot of with the secondary teachers as well. They value group work, technology, manipulatives and whole class time. I often wish college classrooms had room for a carpet section for students to sit down.


While this group saw their concept map evolving into a hierarchy. There's some pretty interesting connections here to look into.
Somehow missed my favorite poster here. Clever use of Facebook, and really made me think about that page as a representation of who someone is. I think there are lots of idealized people I'd be interested in seeing Facebook pages for.

The secondary teacher assistants made quick individual sketches at the end of a seminar. So don't expect the artistic commitment we got from the elementary teachers. One thing that came across in classroom images is the presence of the kind of technology to which they've been exposed. It's becoming clear to me that we need to do a better job of teaching technological pedagogical content knowledge, primarily by explicit modeling.

This teacher is thinking about classroom management as the start of learning.

Next come several visions of cooperative learning. There seems to be a clear value on student discussion, and varying images of what the teacher's role is in relation.


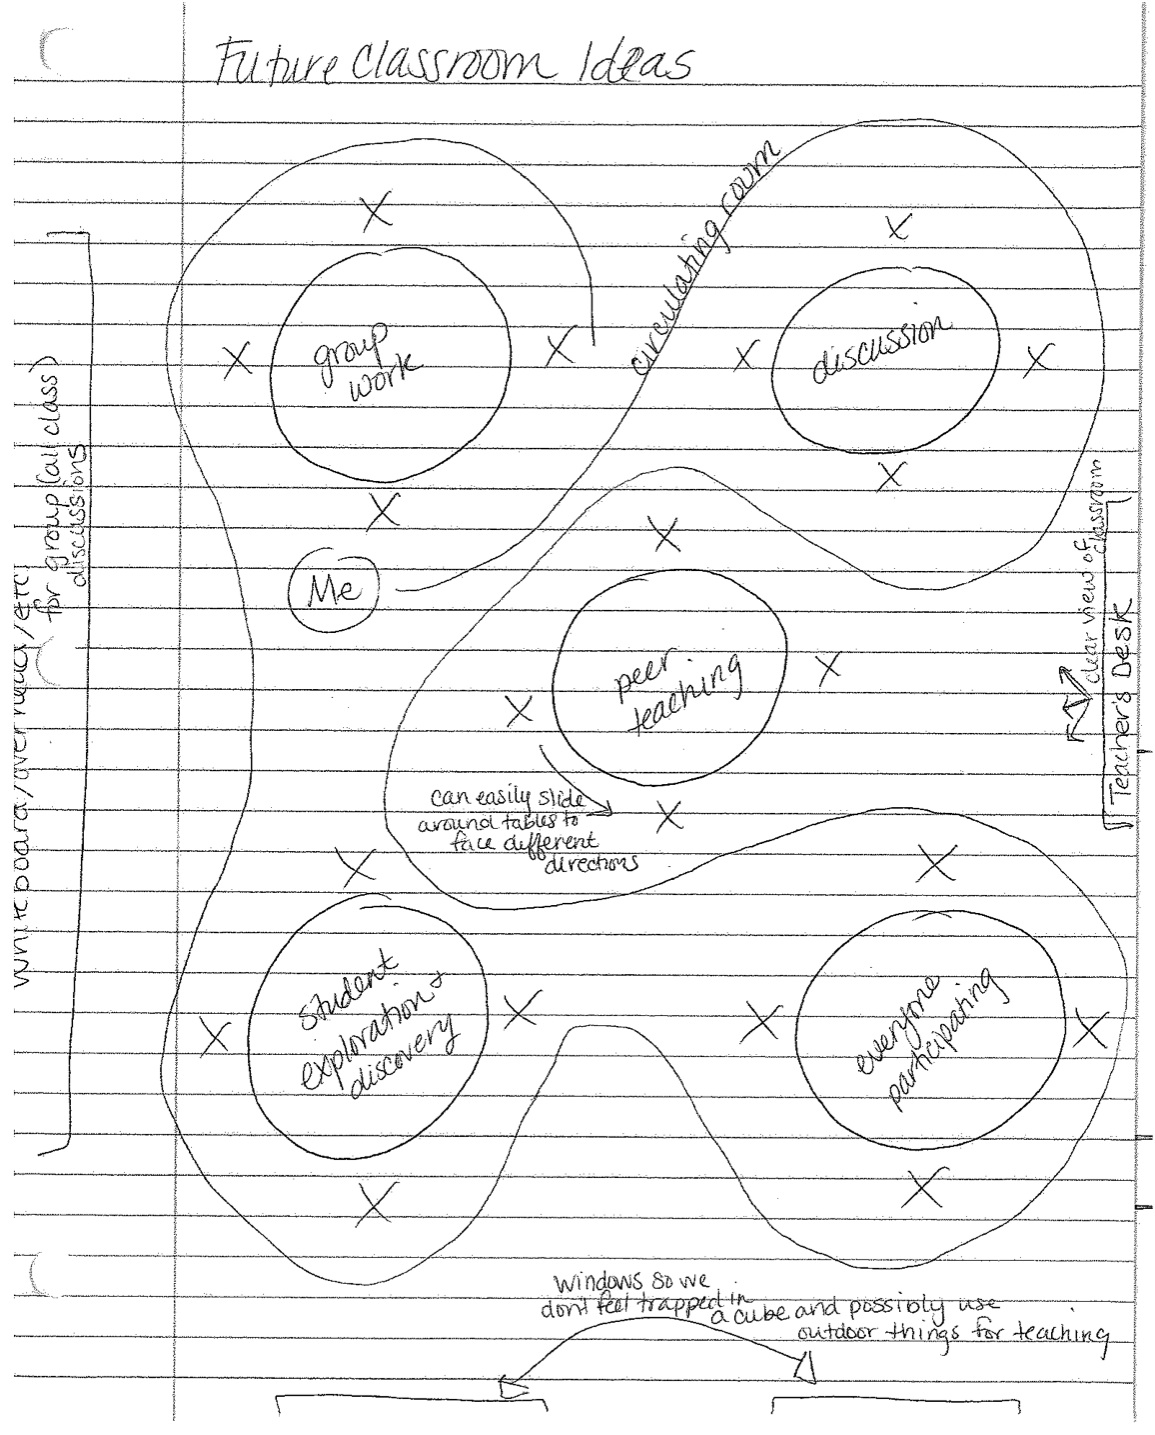
And this sketch merges a vision of the classroom with a concept map of what is important to them.
I'd be very interested in knowing what you think about the images here and what you notice, if you'd care to leave a comment or drop an email. Thanks!
Langganan:
Postingan (Atom)