Continuing my experimentation with #poundlandpedagogy I was looking for a more practical way of using my 'Memo Cube' than just using them as pieces of paper to write notes on. I'd used them in tutor time as scrap pieces of paper to jot down our word of the week examples on, or the numeracy puzzles we do, but wanted to find a 'better' use for them.
So, I decided to use them in a tessellations lesson with my Year 10 set 5 class, using a lesson that @kutrahmoore had previously done.
Before getting into the main activity (using the 'Memo Cube' notes) I introduced the topic of tessellations and referred to the class' previous learning on interior and exterior angles of polygons using this resource that I found on the TES. After briefly going over why the 3 main shapes (square, equilateral triangle and regular hexagon) tessellate I gave the class the w/sheet (slide 12) to complete. The questions on this sheet are very similar to those that come up in the examination papers and so I saw this as good practice for the class. I then advanced through the rest of the slides showing to the class how they can make their own tessellations and how MC Escher created his famous artworks. The class particularly liked how the tessellations were formed and then created and the prepared ppt that you can download above is very well presented to show these.
Then, I introduced the class to how they were going to create their own tessellations. This was where @kutrahmoore's activity came in.
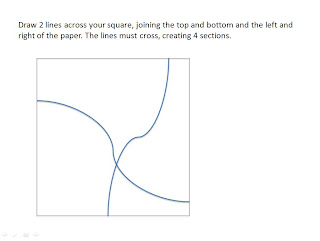
The class were given a couple of the 'Memo Cube' notes and were asked to draw a line from the top of the note to the bottom. It could be any sort of line they liked, straight, 'zigzag', wobbly etc. Then they were asked to draw a line from the left hand side of the note to the right hand side in a similar fashion. This then split their piece of paper into 4 sections.
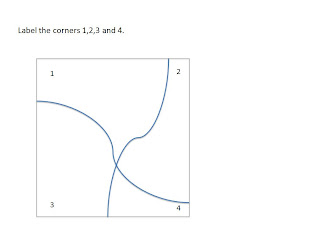
They then had to number the 4 original corners of the square (from left to right, top to bottom, 1, 2, 3 and 4).
They then had something that looked like...(here's the one I used to model the activity to the class)...
After the class had drawn the 2 lines, and numbered the corners 1-4 they were then asked to cut out their 4 sections. This can be seen in the bottom of the 3 images here.
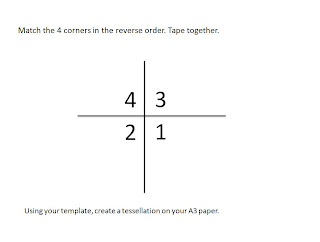
These 4 sections needed to then be rearranged as per the slide shown below...
This then creates the shape the students then use for their tessellations. Once stuck together, front and back, it will look something like...
All they needed to do next was to draw around their shape onto a piece of A3 paper and then keep going to create their tessellations.
Some of the work that was produced was fantastic! We didn't quite have enough time for the majority of students to fill their pieces of A3 paper and then colour them in appropriately to then put up on display. So, they'll continue with them next lesson.
Here's an idea of what they managed to create as the lesson progressed...


Tidak ada komentar:
Posting Komentar